RANE TTM57 MKII
SETUP
Connections
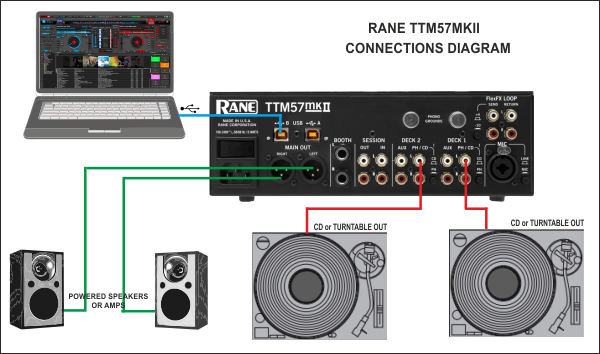
- Connect your computer to USB A (or B) port at the rear panel of Rane TTM57 MKII.
- Connect your Left deck’s RCA cables to ANALOG INPUT DECK1.
If it’s a CD player, select CD with the switch above the input jacks.
If it’s a turntable, select PH (Phono) with the switch above the input jacks. Secure the ground wire to a Phono Ground terminal. - Connect your Right deck’s RCA cables to ANALOG INPUT DECK2.
If it’s a CD player, select CD with the switch above the input jacks.
If it’s a turntable, select PH (Phono) with the switch above the input jacks. Secure the ground wire to a Phono Ground terminal - Set the SOURCE selector for DECK 1 to USB-A (or B if the USB B port is used).
- Set the SOURCE selector for DECK 2 to USB-A (or B if the USB B port is used).
- Connect the Rane TTM57 MKII with AC power using the provided cable and power on the unit
Drivers
Windows: Download and install the necessary ASIO drivers from https://www.rane.com/downloads-legacy#ttm57mkii
Mac OSX: Download and install the necessary CoreAudio drivers from https://www.rane.com/downloads-legacy#ttm57mkii
.
.
VirtualDJ Setup
Once VirtualDJ 8 is launched, a Login Window will appear. Login with your virtualdj.com account credentials.
A Pro Infinity or a Pro Subscription License is required to use the Rane TM57 MKII. Without any of the above Licenses, the controller will operate for 10 minutes each time you restart VirtualDJ.
http://www.virtualdj.com/buy/index.html

Click on the “Use Soundcard” button and VirtualDJ will automatically create and apply the pre-defined audio configuration using the built-in audio interface of the Rane TTM57 MKII.
Click to OK.
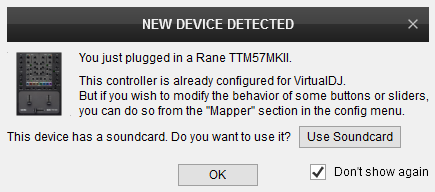
The unit is now ready to operate with VirtualDJ.
MIDI Operation
The factory default Mapping offers the functions described in this Manual, however those can be adjusted to your needs via VDJ Script actions.
Find more details at
http://www.virtualdj.com/wiki/VDJ8script.html
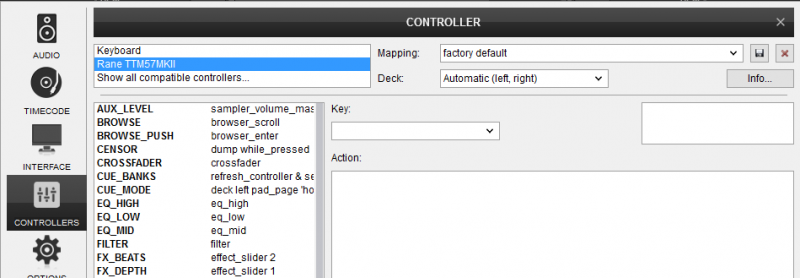
Audio Setup
The unit has a pre-defined Audio setup and a special button in the AUDIO tab of Config to provide that. Alternative setups can be applied in the same window.
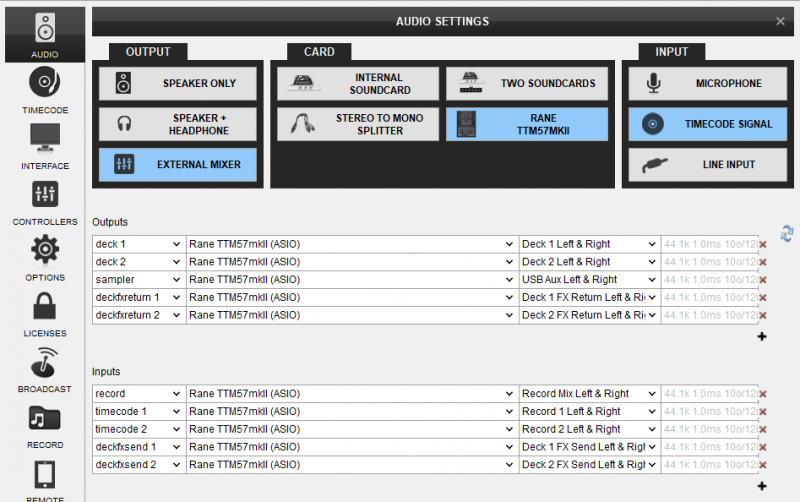
Timecode (DVS)* configuration is pre-configured (see Advanced Setup for more details).
*requires Pro Infinity or Pro Subscription License http://www.virtualdj.com/buy/index.html
For further software settings please refer to the User Guide of VirtualDJ.
http://www.virtualdj.com/manuals/virtualdj/index.html
LAYOUT
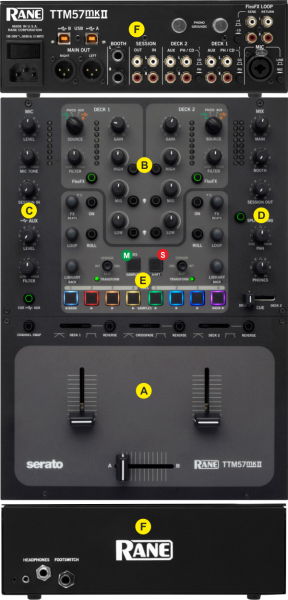
S. SHIFT. Press and hold this button down to access secondary software or hardware functions of other controls on the Rane TTM57 MKII
M. CUE/SAMPLER MODE. Use this button to select a different mode for the 8 colored pads (HotCues and Samples) of the Rane TTM57MKII
The functionality of the Rane Sixty-Two is described in the following chapters
A. Mixer
B. Equalizer
C. Inputs
D. Outputs
E. Deck Controls
F. Front & Rear panels
Volume Mixer
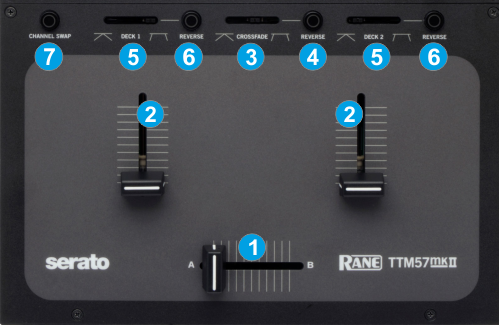
- CROSSFADER. Blends audio between the left and right channels/decks.
- VOLUME. Use these faders to adjust the Output Volume of each mixer channel.
- CROSSFADE CURVE. Adjust the slope of the crossfader curve (cut to smooth behavior)
- REVERSE CF. Crossfader flip switch for normal and reverse behavior.
When enabled Deck 1 will be assigned to the right side of the crossfader and Deck 2 to the left side. - FADER CURVE. Adjust the slope of the fader curve (cut to smooth behavior) for the left and right decks.
- REVERSE FADER. Flip switches for the Left and Right Faders for normal and reverse behavior.
- CHANNEL SWAP. Use this button to swap the Left and Right Channels. When enabled, the left Volume fader will control the output level of the right deck and vice versa.
Note: The Crossfader and Volume faders will move the relative faders of the VirtualDJ GUI, but not vice versa (Fake mixer mode)
Equalizer & Source Selector
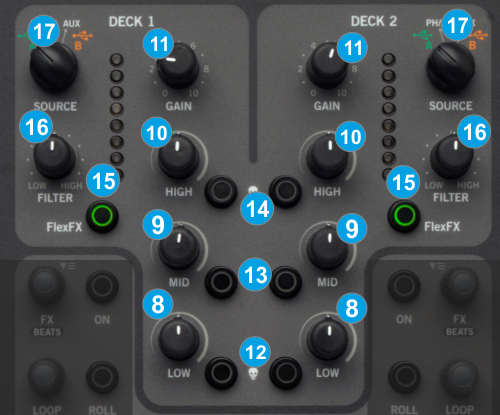
- LOW. Full-cut isolator to adjust the low (bass) frequencies of each mixer channel.
- MID. Full-cut isolator to adjust the middle (mid) frequencies of each mixer channel
- HIGH. Full-cut isolator to adjust the high (treble) frequencies of each mixer channel.
- GAIN. Adjusts the input audio level (trim) up to +15db of the left and right mixer channel. No boost or cut is at 12 o’clock position.
- KILL LOW. Temporary (as long as its pressed) full cut of the low (bass) frequencies of each mixer channel.
- KILL MID. Temporary (as long as its pressed) full cut of the middle (mid) frequencies of each mixer channel.
- KILL HIGH. Temporary (as long as its pressed) full cut of the high (treble) frequencies of each mixer channel.
- FLEXFX. Use this button to route the Output to external Hardware FX unit (connections at the rear side). If no Send-Return FX unit is connected to the rear side, the sound from the software will be muted.
- FILTER. Applies a High-Pass / Low-Pass Filter on each mixer channel.
- SOURCE SEL. Set this selector to the appropriate position to define which Channel Input will be routed to the 2 Mixer Channel Outputs (DECK 1 and DECK 2).
On USB A or USB B position, the audio signal from the computer connected to the USB A or USB B port (rear panel) will be routed to the Output of this Mixer Channel and assign the MIDI controls for the Left or Right channels to the same computer.
On INPUTS PH/CD, AUX the audio signal from the relative Inputs will be routed directly to the Output of this Mixer Channel. In this case the sound from the computer’s decks will be muted. Use these positions to route external analogue media sources or the PH/CD.
Inputs

- MIC LEVEL. Use this knob to adjust the output level of the microphone input. Turn the knob to the far left position to mute (turn off) the Microphone input.
- MIC TONE. Use this knob to adjust the tone of the microphone input channel.
- SESSION IN. Use this knob to adjust the level of the SESSION Input (connection at the rear panel)
- AUX LEVEL. Use this knob to adjust the Output level of the AUX Input. In VirtualDJ, the AUX Input has been assigned to the Sampler. Use this knob to adjust the Output level of the VirtualDJ Sampler to the Master Output.
- AUX FILTER. Apply a High/Low pass Filter to the AUX Input channel. In VirtualDJ, use this knob to apply a Filter to the Sampler.
- CUE-AUX. Use this button to send the AUX Input (Sampler by default) to the Headphones channel for previewing.
Outputs

- MAIN MIX. Use this knob to control the Output level of the Master Output.
- BOOTH. Use this knob to control the Output level of the Booth Output.(connection at the rear panel)
- SESSION OUT. Use this knob to control the Output level of the Session Output (connection at the rear panel)
SESSION IN and OUT are typically used to chain mixers together, through any line-level device may be connected to the Session Input and mixed here. - SPLIT CUE. When enabled the PAN knob (28) will pan between Mono Cue in the left ear and mono Main Mix in the right ear.
- PHONES PAN. Use this knob to mix between CUE and Program MIX in the Headphone channel. When all the way to the left, only channels routed to Headphones (via the CUE buttons) will be heard. When all the way to the right, only the Program mix will be heard.
- PHONES LEVEL. Use this knob to adjust the volume of the Headphones Channel
- CUE FADER. Use this fader to select the channel you wish to prelisten with Headphones. When the fader is at the far left position, the Left Deck will be routed to the Headphones channel. If the fader is at the far right position, the right deck will be routed to the Headphones channel. In all other positions, the sound from both decks will blend and routed to the Headphones.
Software Controls
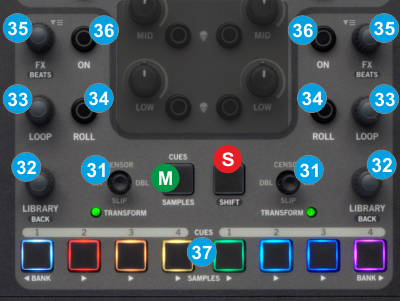
- JOYSTICK. Push the Joystick to select the Mute mode (TRANSFORM LED will be turned on). In this mode, use the joystick to any direction to temporary mute the corresponding channel. Push again to return to the Default mode.
In Default mode (TRANSFORM LED off):
Move the Joystick towards down to enable/disable Slip mode. When Slip mode is enabled (TRANSFORM LED will blink), several functions (such as scratching, HotCues and Loops) will act temporary and the track will resume to the position it would have been if this action was never triggered.
Move the Joystick to the DBL position (towards right for the Left deck and towards left for the Right deck), to clone the other deck to this deck. (Instant Doubles)
Move the Joystick to the INT position to enable/disable Timecode control on the corresponding deck.
Move the Joystick towards up to play the track reversed. Once the Joystick is released, the track will continue playing forward from the position it would have been as if the reverse was never triggered (Censor). - LIBRARY KNOB.
Use this encoder to scroll through files or folders in the selected Browser Window.
Push the encoder to enter the Songs list (if the focus is on the Folders list) or load the selected track to the left or right deck (if focus is on any other Browser window)
If the focus is on the Songs list, hold SHIFT down and then push the encoder to set focus to the Folders list.
If the focus is on the Folders list, hold SHIFT down and then push the encoder to expand/collapse subfolders. - LOOP ENC. Use this encoder to select the length of the applied loop in beats. Turn clockwise to double the size and anti-clockwise to half the size.
Push the encoder to trigger the selected loop. - ROLL. Press and keep this button down to apply a temporary Loop Roll. Once the button is released, the track will return to the position it would have been if the Loop has never been triggered.
While the ROLL button is pressed, use the LOOP encoder to adjust the length of the applied Loop Roll. - FX BEATS. Push the encoder to toggle between the Select (LED of the will flash) and the Parameter (LED off) control modes.
In Select mode, use this encoder to select a VirtualDJ Effect for the left and right decks.
In Parameter mode, use this encoder to adjust the 1st Parameter of the selected Effect, or have SHIFT pressed to control the 2nd Parameter of the selected effect. - FX ON. Use this button to enable/disable the selected Effect of the left and right deck.
- HOTTCUES/ SAMPLES Each one of the 8 Pads offers a different functionality, depending on the selected mode (M)
HotCues 1-4 mode
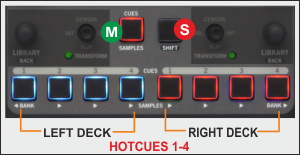 Press the CUES/SAMPLER mode button to select the HotCues mode (LED will become red)
In this mode each one of the 4 buttons per side (1-4) assigns a Hot Cue Point (1 to 4) to the left or right deck (if un-assigned) or returns the track to that Hot Cue Point if assigned.
When a Hot Cue Button is unlit, you can assign a Hot Cue Point by pressing it at the desired point in your track. Once it is assigned, the Hot Cue Button will light up blue (for Left deck) or red (for Right deck).
Hold SHIFT down and then press any of these buttons to delete its assigned Hot Cue Point.
HotCues 5-8 mode
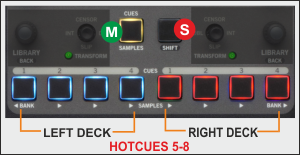 While the HotCue 1-4 mode is selected, hold SHIFT down and then press the CUES/SAMPLER mode button to select the HotCues 5-8 mode (LED will become yellow)
In this mode each one of the 4 buttons per side (1 - 4) assigns a Hot Cue Point (5 to 8) to the left or right deck (if un-assigned) or returns the track to that Hot Cue Point if assigned.
When a Hot Cue Button is unlit, you can assign a Hot Cue Point by pressing it at the desired point in your track. Once it is assigned, the Hot Cue Button will light up blue (for Left deck) or red (for Right deck).
Hold SHIFT down and then press any of these buttons to delete its assigned Hot Cue Point.
Sampler mode
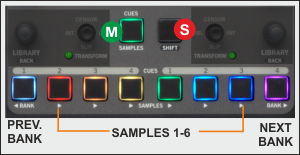 Press the CUES/SAMPLER mode button to select the Sampler mode (LED will become green)
In this mode each one of the 6 buttons (marked as >) triggers a sample (1 to 6) from the selected Sampler Bank of VirtualDJ.
The leds of those buttons will be turned off if the corresponding slot is unloaded, and will get the color of the assigned sample (if loaded)
Hold SHIFT down and then press any of these Sampler buttons to stop the playing Sample (useful if the Stutter or Unmute Trigger mode is selected)
Use the <BANK button to select and load the previous available Sampler Bank
Use the >BANK button to select and load the next available Sampler Bank
Sampler Output Channel: By default VirtualDJ will send Sampler to the USB AUX Channel. Use the AUX LEVEL knob to control the Output Volume and the AUX Filter knob to apply a Low-High Pass Filter to the playing samples.
Front & Rear panel
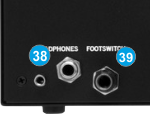
- HEADPHONES SOCKET. Connect your ¼” or 1/8” headphones to these outputs for cueing and mix monitoring.
- FOOTSWITCH. ¼” TRS footswitch connection. Footswitch controls are not mapped to any function, but can be learned/assigned from Settings->Controllers tab of VirtualDJ.
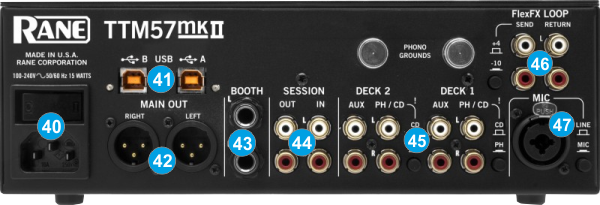
- POWER. Connect the supplied universal AC cord. Power on the unit after all the necessary connections are done.
- USB A/B. These USB connections send and receive audio and control information from the connected computers. See more details in Back to Back.
- MAIN OUT. Connect your amplifier using a pair of balanced XLR jacks. The level of this output is controlled by the MAIN knob at the top panel
- BOOTH OUT Use a pair of balanced ¼“ TRS jacks to connect the unit with your secondary output (e.g. for monitor). The level of this output is controlled by the BOOTH knob at the top panel
- SESSION IN/OUT. Use standard RCA cables for the connections. The level of both Input and Output are controlled by the SESSION IN and OUT knobs at the top panel.
- ANALOG INPUTS. Two Phono/CD inputs are provided by RCA jacks for each mixer channel (DECK 1 / DECK 2). These may be set for PH or CD using the rear panel slide switches. PH/CD inputs may be selected as Timecode Inputs or for recording on USB stereo pair 5-6. See Timecode (DVS).
Connect your turntable ground wires to the PHONO GOUND posts on the rear when using PH inputs. - FLEXFX LOOP Use standard RCA cables for the SEND and RETURN Inputs. The FlexFX output is normally used to connect outboard effects.
- MIC INPUT Connect your microphone using a XLR 3-pin plug, a balanced ¼” TRS plug or unbalanced TS plug. This input may be set as Microphone or Line Input using the MIC-LINE switch on the rear panel. Set this to Line when connecting a wireless receiver.
Note: The Main, Booth and Session outputs arrive from the same “Main Mix” signal. Each one of them has its own LEVEL control at the top panel. Because all signals are identical, users may use any of these outputs as the “Main” output if a different cable type is required for system connection.
Advanced Setup
As mentioned, the Rane TTM57MKII is offering a pre-defined audio configuration for Timecode (DVS) and Sampler routing to the AUX USB Channel. Further details and alternative setups are described below.
Timecode (DVS)
VirtualDJ is offering DVS (Digital Vinyl System) support for the Rane TTM57MKII. A timecode Plus or Pro Infinity license is required. 2 Timecode Inputs are available to control any software decks via Timecode CDs or Vinyls.
Both Mixer Decks can accept LINE (Timecode CDs) and PHONO Sources (Timecode Vinyls) depending on the LN/PH switchers at the rear panel of the unit.
- Connect your Timecode devices at the rear panel of the Rane TTM57MKII to the PH/CD Inputs
Click on the ON buttons from the TIMECODE panels of the Default Skin to enable the Timecode control to the left and/or right deck. - Press PLAY on your timecode CD or Vinyl device and VirtualDJ will automatically detect your Timecode type and make the appropriate adjustments for best performance.
- Open the TIMECODE tab of the VirtualDJ Settings and choose the CALIBRATE button if for any reason the signal is not detected (possibly due to reversed phase connections).
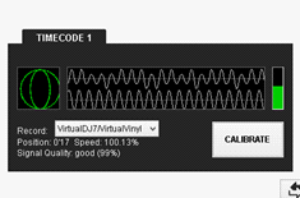

If no Timecode Inputs need to be used, it is suggested to delete the Timecode lines from the pre-defined audio configuration and save your custom audio settings as an alternative profile.
Sampler Output
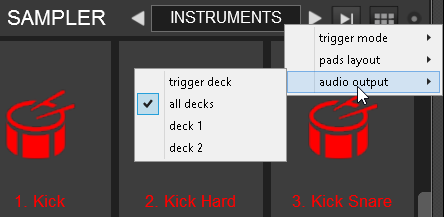
You may specifically route the Sampler output to deck 1, deck 2, both decks and active deck. In that case, you will need to delete the Sampler line from the Audio configuration and choose the desired Output via the Sampler Options.
Back to back
The Rane TTM57MKII has two USB ports, allowing simultaneous connection of two computers. Each port is completely independent. It is possible to run VirtualDJ on one computer and any other 3rd-party DJ-software on the other, Mac or PC.
How to:
- Connect the 2nd computer to the unused USB port on the TTM57MKII.
- Switch the DECK SOURCE selector at the top panel on the non-playing mixer channel to the USB source of the 2nd computer.
- Play a track on this deck and mix it when ready – you ll now have audio from both computers during the mix.
- When only audio from the 2nd computer is left in the mix, remove the first computer.
- Assign the DECK SOURCE for the remaining free mixer channel to the 2nd computer and keep mixing.
Recording
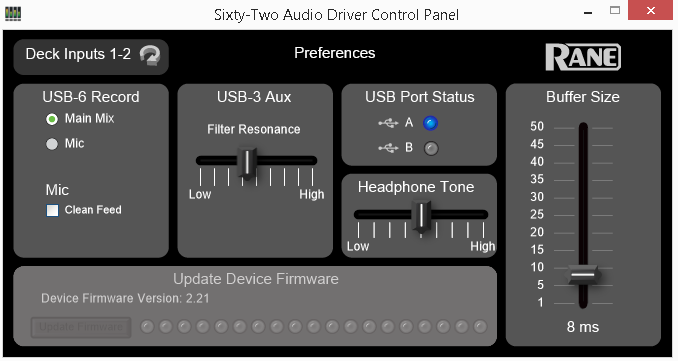
The Rane TTM57MKII has a dedicated USB Input to record your Main Mix (default setting) and the Microphone. VirtualDJ has pre-configured this input for recording, thus no special setting is required in order to record your mix (including analogue sources and Microphone).
Simply make sure the Main Mix is selected as in the Rane Audio Driver control panel for the USB 6 Record Input and use the REC or BSCAST buttons from the MASTER center panel of the VirtualDJ GUI.
